2014年9月17日 星期三

Norikra 試用紀錄

Norikra is a open source server software provides "Stream Processing" with SQL, written in JRuby, runs on JVM, licensed under GPLv2.
  1. install JRuby (downloads)
  2. # tar xzvf jruby-bin-1.7.15.tar.gz
    # mv jruby-1.7.15 /opt
    # echo "PATH=$PATH:/opt/jruby-1.7.15/bin" > ~/.bashrc
    # jruby -v
    jruby 1.7.15 (1.9.3p392) 2014-09-03 82b5cc3 on Java HotSpot(TM) 64-Bit Server VM 1.6.0_33-b04 +jit [linux-amd64]
  3. install Norikra (要等個幾分鐘才會開始裝)
  4. # gem install norikra
  5. start Norikra (要等個幾分鐘才會啟動成功)
  6. # norikra start
  7. Norikra web UI :http://IP:26578
  8. 以 web service 的 log 為例,首先定義 target 的欄位 (minimal fields set for variations of 'www' events),定義最基本的欄位就好,可再修改
  9. # norikra-client target open www path:string status:integer referer:string agent:string userid:integer
    # norikra-client target list
    TARGET  AUTO_FIELD
    www     true
    1 targets found.
  10. 加入 query 指令:查詢首頁(path="/")被存取的次數
  11. # norikra-client query add www.toppage 'SELECT count(*) AS cnt FROM www WHERE path="/" AND status=200'
  12. 加入 query 指令 with Views (Windows)。Views are used to define time windows or to control timing to fire events. With views, norikra controls the range of events for each queries.
  13. # norikra-client query add www.toppageviews 'SELECT count(*) AS cnt FROM www.win:time_batch(3 sec) WHERE path="/" AND status=200'
  14. 開始將資料送到 norikra
    • script
    • #!/bin/sh
      for i in `seq 1 1 3`;
      do
        data1='{"path":"/", "status":200, "referer":"", "agent":"MSIE", "userid":3}'
        echo `date +"%Y/%m/%d-%H:%M:%S"` $data1
        echo $data1 | norikra-client event send www
        sleep 3
        #
        data2='{"path":"/login", "status":301, "referer":"/", "agent":"MSIE", "userid":3}'
        echo `date +"%Y/%m/%d-%H:%M:%S"` $data2
        echo $data2 | norikra-client event send www
        sleep 3
        #
      done
      
    • log
    • 2014/09/17-23:07:58 {"path":"/", "status":200, "referer":"", "agent":"MSIE", "userid":3}
      2014/09/17-23:08:13 {"path":"/login", "status":301, "referer":"/", "agent":"MSIE", "userid":3}
      2014/09/17-23:08:29 {"path":"/", "status":200, "referer":"", "agent":"MSIE", "userid":3}
      2014/09/17-23:08:45 {"path":"/login", "status":301, "referer":"/", "agent":"MSIE", "userid":3}
      2014/09/17-23:09:00 {"path":"/", "status":200, "referer":"", "agent":"MSIE", "userid":3}
      2014/09/17-23:09:16 {"path":"/login", "status":301, "referer":"/", "agent":"MSIE", "userid":3}
  15. 查看 query 結果
  16. # norikra-client event see www.toppage
    {"time":"2014/09/17 23:08:10","cnt":1}
    {"time":"2014/09/17 23:08:41","cnt":2}
    {"time":"2014/09/17 23:09:13","cnt":3}
    
    # norikra-client event see www.toppageviews
    {"time":"2014/09/17 23:08:13","cnt":1}
    {"time":"2014/09/17 23:08:16","cnt":0}
    {"time":"2014/09/17 23:08:43","cnt":1}
    {"time":"2014/09/17 23:08:46","cnt":0}
    {"time":"2014/09/17 23:09:16","cnt":1}
    {"time":"2014/09/17 23:09:19","cnt":0}
  17. 取得 query 結果,取到的結果會被刪除,如沒有新的事件發生,再查看 query 結果是沒有資料的
  18. # norikra-client event fetch www.toppageviews
    {"time":"2014/09/17 23:08:13","cnt":1}
    {"time":"2014/09/17 23:08:16","cnt":0}
    {"time":"2014/09/17 23:08:43","cnt":1}
    {"time":"2014/09/17 23:08:46","cnt":0}
    {"time":"2014/09/17 23:09:16","cnt":1}
    {"time":"2014/09/17 23:09:19","cnt":0}
    
    # norikra-client event fetch www.toppageviews

心得:
  • 易上手,定義 data set 後,寫少少的程式(SQL)就可開始做資料處理。
  • 具備排程功能,資料處理的動作可以 run forever,可設定對全部的資料做處理或者一次處理一段時間內的資料,因資料皆存在 memory 中,對全部的資料做處理時要注意 out of memory 的問題。
  • 安裝簡單,單機作業,無資料分散 or 運算分散的架構(ex: storm)。
  • 目前無考慮 HA,作者說也不需要考慮。
  • 想想適合用在哪裡?複雜多樣的小資料收集與前處理,定期 fetch 處理結果 or 一前處理完就往其他地方匯出,清空主機 memory。
參考資料:

install python 2.7 & virtualenv on CentOS 6


  1. 安裝 gcc
  2. # yum install gcc gcc-c++.x86_64 compat-gcc-34-c++.x86_64 openssl-devel.x86_64 zlib*.x86_64
  3. Build Python-2.7 (downloads)
  4. # wget https://www.python.org/ftp/python/2.7.8/Python-2.7.8.tgz
    # tar zxvf Python-2.7.8.tgz
    # cd Python-2.7.8
    # ./configure --enable-shared
    # make
    # make install
  5. 載入動態資料庫
  6. # touch /etc/ld.so.conf.d/python2.7.conf
    # vim /etc/ld.so.conf.d/python2.7.conf
    /usr/local/lib
    # ldconfig
  7. install virtualenv
  8. # python-pip install virtualenv
  9. 利用 virtualenv 建立 python 2.7 的開發環境 (因為 CentOS 6 預設的 python 版本為 2.6,預設的版本最好不要亂改)
  10. # virtualenv fayeENV --python=python2.7
    # source fayeENV/bin/activate
    # python
    Python 2.7.8 (default, Sep 17 2014, 15:35:06)
    [GCC 4.4.7 20120313 (Red Hat 4.4.7-4)] on linux2
    Type "help", "copyright", "credits" or "license" for more information.
    >>>
  11. 離開 python 2.7 開發環境
  12. # deactivate
參考資料:

2014年9月16日 星期二

install python-pip on CentOS 6


  1. turn on EPEL repo for CentOS
  2. # wget http://mirror-fpt-telecom.fpt.net/fedora/epel/6/i386/epel-release-6-8.noarch.rpm
    # rpm -ivh epel-release-6-8.noarch.rpm
  3. install python-pip
  4. # yum install python-pip
  5. 完成安裝,之後可用下列指令安裝 python 套件
  6. # python-pip install <package_name>
參考資料:

2011年3月17日 星期四

Install NFS server on Ubuntu 10.04

1. 安裝 NFS server 套件
  
    sudo apt-get install nfs-common nfs-kernel-server

2. 設定要共享的路徑和使用權限

    sudo vim /etc/exports

    #將 /nfs_root 這個路徑 share 給 all net 使用,但只可讀並且資料會同步寫入到記憶體與硬碟中。
    /nfs_root *(ro,sync,no_subtree_check)

3. 啟動 NFS server

    sudo /etc/init.d/nfs-kernel-server start

4. 檢查 NFS server 是否成功被啟動了

    sudo showmount -e localhost

    #看到底下剛剛設定的共享路徑代表成功了。
    Export list for localhost:
    /nfs_root *


註:
(1) 使用者可以用 showmount -e nfs_server_ip 看這個NFS server有哪些共享路徑。
(2) 使用者可以用 mount -t nfs nfs_server_ip:共享路徑 /mnt 來掛載NFS server提供的共享路徑。


[Reference]

[XenServer] Add Virtual disk storage ( 以 NFS 和 iSCSI 為例 )

NFS VHD

1. 在要新增 Virtual disk storage 的 XenServer 上面按右鍵,選擇 New Storage


2. 選擇 NFS VHD


3. 設定這個 Virtual disk storage 的名稱和要掛載的NFS路徑,路徑格式為" NFS server IP:共享資料夾路徑 "。


4. 完成後,會在選擇的 XenServer 底下看到這個 NFS virtual disk storage,還有它的詳細資訊。


Software iSCSI

1. 選擇 Software iSCSI


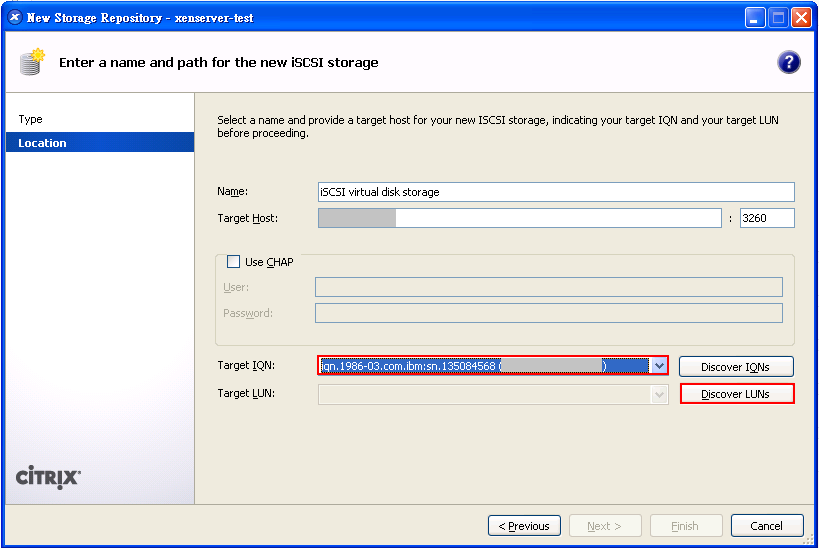
2. 設定這個 Virtual disk storage 的名稱和 iSCSI host IP,接著按下 Discover IQNs

3. 選擇適當的 Target IQN,按下 Discover LUNs

4. 選擇你要掛載的 LUN,按下 Finish。接著它會跳出一個警告視窗問你是否確定要格式化這個儲存空間,按下,便會開始新增這個 Virtual disk storage。


5. 成功後,會在選擇的 XenServer 底下看到這個 iSCSI virtual disk storage,還有它的詳細資訊。

[XenServer] Create VMs ( 以 Windows XP 為例 )

1. 選擇 VM 要開在哪一台 XenServer 上面,並在此 XenServer 上按右鍵選擇 New VM


2. 選擇 VM 的 Template。


3. 填寫這個 VM 的名稱和描述。


4. 選擇這個 VM 要掛載的iso檔,當 VM 啟動後會從 DVD drive 開機,我們就可以從掛載的iso檔來安裝 VM 的作業系統了。


5. 選擇 VM 要啟動在哪一台 XenServer 上面。


6. 設定 VM 的 CPU 數量和 Memory 大小。


7. 設定 VM 的 virtual disk 大小。


8. 選擇 VM 的網卡。


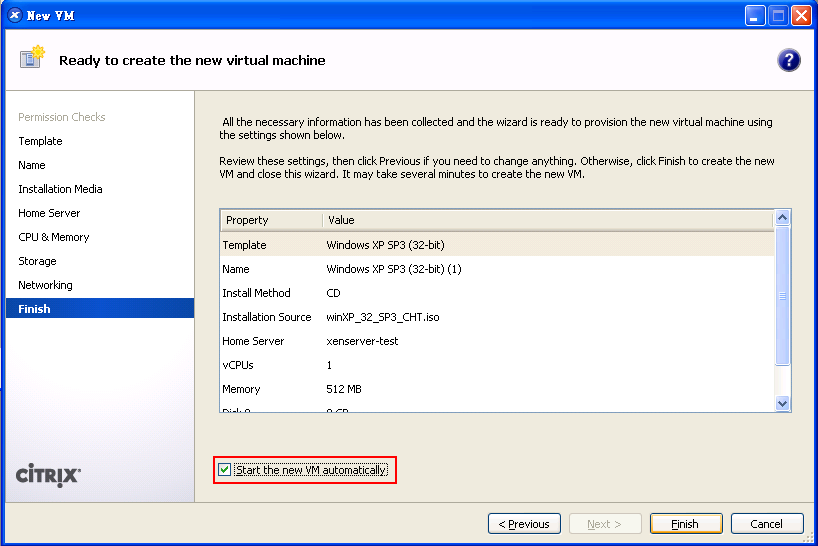
9. 基本設定完成後,勾選自動啟動這個 VM,方便我們進行安裝作業系統的動作。


10. 當 VM 建立完成後,可以在啟動這個 VM 的 XenServer 底下看到我們新建立的 VM。接著我們可以透過 VM 的 Console 來安裝它的作業系統。

2011年3月16日 星期三

[XenServer] Create ISO library

1. 開啟 XenCenter,選擇 Storage -> New Storage。


2. 掛載ISO檔有兩種方式,一種是用CIFS( Common Internet File System )的方式,另一種是用NFS( Network File System )的方式來將ISO檔掛載在XenServer上。
  • CIFS方式適用於 Windows 作業系統,可以選擇一個資料夾將要掛載的ISO檔放在這個資料夾,並且啟動共用此資料夾的功能,這邊我們將會用這個方式掛載ISO檔。
  • NFS方式適用於 Linux 作業系統,架設一個 NFS server,設定要共用的路徑,將要掛載的ISO檔放在這個路徑下。


3. 在 Windows 作業系統下設定共用資料夾。先選擇要共用的資料夾按下右鍵選擇內容,接著選擇共用標籤,勾選在網路上共用這個資料夾的選項,並且設定這個共用資料夾的名稱。


4. 接著在 XenCenter 輸入剛剛設定好的共享資料夾路徑,路徑格式為" \\電腦IP\共享資料夾名稱 "。


5. 成功後,CIFS ISO library 會出現在這個 XenServer 底下,右邊可以看到這個 CIFS ISO library 有哪些可以掛載的ISO檔。